目录
用 GitHub Actions 自动构建并推送 Docker 镜像(CI/CD)
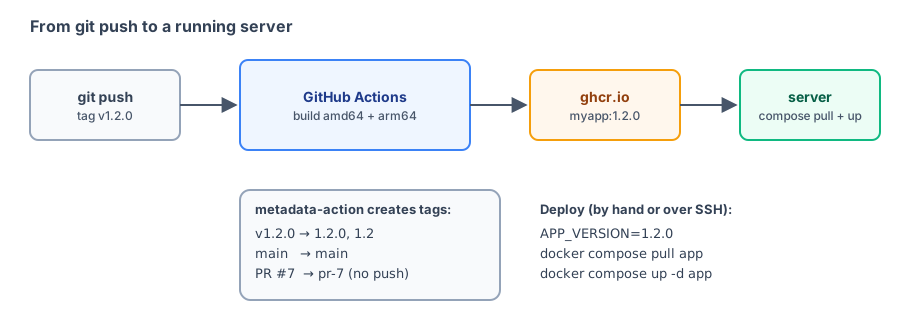
在部署到云主机一节中,构建、推送和更新服务器都需要手动执行。本节使用 GitHub Actions 将这些步骤自动化:
- 每次推送到
main:自动构建并推送镜像,tag 为main。 - 创建版本 tag(例如
v1.2.0):构建 amd64 + arm64 镜像,推送1.2.0、1.2等 tag,然后自动通过 SSH 更新服务器。 - Pull Request:只构建、不推送,以确认 Dockerfile 没有问题。
项目结构
沿用部署到云主机中的 Node.js 项目,并添加一个 workflow 文件:
myapp/
├── .github/
│   └── workflows/
│       └── docker.yml
├── Dockerfile
├── package.json
├── package-lock.json
└── server.js
GitHub 会自动运行 .github/workflows/ 中的所有 YAML 文件。
完整的 workflow
.github/workflows/docker.yml:
name: Build and push image

on:
  push:
    branches: [main]
    tags: ["v*"]
  pull_request:

permissions:
  contents: read
  packages: write

jobs:
  build:
    runs-on: ubuntu-latest
    steps:
      - uses: actions/checkout@v7

      - name: Check Dockerfile
        run: docker build --check .

      - uses: docker/setup-qemu-action@v4

      - uses: docker/setup-buildx-action@v4

      - name: Log in to GitHub Container Registry
        if: github.event_name != 'pull_request'
        uses: docker/login-action@v4
        with:
          registry: ghcr.io
          username: ${{ github.actor }}
          password: ${{ secrets.GITHUB_TOKEN }}

      - name: Decide image tags
        id: meta
        uses: docker/metadata-action@v6
        with:
          images: ghcr.io/${{ github.repository }}
          tags: |
            type=ref,event=branch
            type=ref,event=pr
            type=semver,pattern={{version}}
            type=semver,pattern={{major}}.{{minor}}
            type=sha

      - name: Build and push
        uses: docker/build-push-action@v7
        with:
          context: .
          platforms: linux/amd64,linux/arm64
          push: ${{ github.event_name != 'pull_request' }}
          build-args: APP_VERSION=${{ github.ref_name }}
          tags: ${{ steps.meta.outputs.tags }}
          labels: ${{ steps.meta.outputs.labels }}
          cache-from: type=gha
          cache-to: type=gha,mode=max

  deploy:
    needs: build
    if: startsWith(github.ref, 'refs/tags/v')
    runs-on: ubuntu-latest
    steps:
      - name: Update the server
        uses: appleboy/ssh-action@v1
        with:
          host: ${{ secrets.DEPLOY_HOST }}
          username: ${{ secrets.DEPLOY_USER }}
          key: ${{ secrets.DEPLOY_SSH_KEY }}
          script: |
            cd /srv/myapp
            VERSION='${{ github.ref_name }}'
            sed -i "s/^APP_VERSION=.*/APP_VERSION=${VERSION#v}/" .env
            docker compose pull app
            docker compose up -d app
逐段说明
触发条件与权限
on:
  push:
    branches: [main]
    tags: ["v*"]
  pull_request:

permissions:
  contents: read
packages: write- 推送到
main分支、推送以v开头的 tag,以及创建 Pull Request 时运行。 packages: write允许自动提供的GITHUB_TOKEN推送到 ghcr.io。只授予所需权限是个好习惯。
构建前先检查
      - name: Check Dockerfile
        run: docker build --check .
GitHub 的 ubuntu-latest 运行环境已经安装 Docker。docker build --check 只检查 Dockerfile 的写法(介绍见 docker init),出现警告时不会导致构建失败,但会显示在日志中。这个项目的 Dockerfile 在本机检查结果如下:
$ docker build --check . 2>&1 | tail -n 1
Check complete, no warnings found.
QEMU 与 Buildx
      - uses: docker/setup-qemu-action@v4
      - uses: docker/setup-buildx-action@v4
GitHub 的运行环境是 amd64。要构建 arm64 镜像,并且 Dockerfile 中有 RUN npm ci 这类需要运行程序的步骤时,就需要 QEMU 模拟(原因见多平台镜像)。setup-buildx-action 会创建一个支持多平台和导出缓存的 builder。
登录 Registry
      - name: Log in to GitHub Container Registry
        if: github.event_name != 'pull_request'
        uses: docker/login-action@v4
        with:
          registry: ghcr.io
          username: ${{ github.actor }}
          password: ${{ secrets.GITHUB_TOKEN }}
Pull Request 不会推送镜像,因此不需要登录(来自外部的 PR 也无法获得推送权限)。secrets.GITHUB_TOKEN 不需要自行创建。
如果要改为推送到 Docker Hub,先在 Docker Hub 创建 Access Token,将其保存到 GitHub 仓库的 Settings → Secrets and variables → Actions,然后使用:
        with:
          username: ${{ secrets.DOCKERHUB_USERNAME }}
          password: ${{ secrets.DOCKERHUB_TOKEN }}
(不写 registry 就表示使用 Docker Hub),并将 metadata-action 的 images 改为 你的账号/myapp。
自动确定镜像 tag
docker/metadata-action 会根据触发 workflow 的事件生成 tag:
| 触发事件 | 生成的 tag |
|---|---|
推送到 main | main、sha-1a2b3c4 |
推送 tag v1.2.0 | 1.2.0、1.2、sha-1a2b3c4 |
| Pull Request #7 | pr-7、sha-1a2b3c4(只构建、不推送) |
type=semver只会在 tag 符合语义化版本(v1.2.0)时生成,并去掉开头的v。type=sha使用 commit 的前 7 位,方便追踪镜像是由哪个版本的代码构建的。- 它还会生成 OCI 标准的 labels(来源仓库、commit、创建时间),由 build-push-action 写入镜像。
构建与推送
      - name: Build and push
        uses: docker/build-push-action@v7
        with:
          context: .
          platforms: linux/amd64,linux/arm64
          push: ${{ github.event_name != 'pull_request' }}
          build-args: APP_VERSION=${{ github.ref_name }}
          tags: ${{ steps.meta.outputs.tags }}
          labels: ${{ steps.meta.outputs.labels }}
          cache-from: type=gha
cache-to: type=gha,mode=max| 参数 | 说明 |
|---|---|
platforms | 同时构建两种架构,推送后成为一个多平台镜像 |
push | Pull Request 时为 false,只构建 |
build-args | 对应 Dockerfile 的 ARG APP_VERSION,程序可以显示自己的版本 |
tags / labels | 使用上一步 metadata-action 的输出 |
cache-from / cache-to: type=gha | 将构建缓存保存在 GitHub Actions 的缓存空间中。mode=max 也会缓存中间阶段的层,下次只修改代码时,可以直接重用 npm ci 那一层 |
自动部署
  deploy:
    needs: build
    if: startsWith(github.ref, 'refs/tags/v')
needs: build:构建成功后才运行。if:只有推送版本 tag 时才部署,推送到main不会影响生产环境。
appleboy/ssh-action 会通过 SSH 登录服务器并执行 script,其中的操作就是部署到云主机一节中手动执行的步骤:修改 .env 中的 APP_VERSION,然后运行 pull 和 up -d。${{ github.ref_name }} 是 tag 名称(v1.2.0),${VERSION#v} 会去掉开头的 v。下面这条 sed 命令在本机的运行结果如下:
$ VERSION='v1.2.0'; sed -i "s/^APP_VERSION=.*/APP_VERSION=${VERSION#v}/" .env; cat .env
APP_VERSION=1.2.0
DB_PASSWORD=secret
需要在 GitHub 仓库的 Secrets 中设置以下三个值:
| Secret | 内容 |
|---|---|
DEPLOY_HOST | 服务器的 IP 或域名 |
DEPLOY_USER | SSH 用户名 |
DEPLOY_SSH_KEY | 专门用于部署的 SSH 私钥(对应的公钥放在服务器的 ~/.ssh/authorized_keys 中) |
建议创建专用的用户和密钥来部署,不要使用你自己登录服务器时用的密钥。
使用 actionlint 验证 workflow
Workflow 写错时,通常要推送到 GitHub 后才能发现,反复修改会花很多时间。开源工具 actionlint 可以在本机检查语法和表达式,使用容器运行即可,无需安装:
$ docker run --rm -v "$(pwd):/repo" -w /repo rhysd/actionlint:latest -color=false -verbose .github/workflows/docker.yml
verbose: Linting .github/workflows/docker.yml
verbose: Found 0 parse errors in 1 ms for .github/workflows/docker.yml
verbose: Found total 0 errors in 13 ms for .github/workflows/docker.yml
0 errors 表示没有问题。故意将 github.ref_name 写错为 github.ref_nam:
$ docker run --rm -v "$(pwd):/repo" -w /repo rhysd/actionlint:latest -color=false .github/workflows/docker.yml
.github/workflows/docker.yml:52:39: property "ref_nam" is not defined in object type {action: string; action_path: string; action_ref: string; action_repository: string; action_status: string; actor: string; actor_id: string; api_url: string; artifact_cache_size_limit: number; base_ref: string; env: string; event: object; event_name: string; event_path: string; graphql_url: string; head_ref: string; job: string; output: string; path: string; ref: string; ref_name: string; ref_protected: bool; ref_type: string; repository: string; repository_id: string; repository_owner: string; repository_owner_id: string; repository_visibility: string; repositoryurl: string; retention_days: number; run_attempt: string; run_id: string; run_number: string; secret_source: string; server_url: string; sha: string; state: string; step_summary: string; token: string; triggering_actor: string; workflow: string; workflow_ref: string; workflow_sha: string; workspace: string} [expression]
   |
52 |           build-args: APP_VERSION=${{ github.ref_nam }}
   |                                       ^~~~~~~~~~~~~~
actionlint 指出第 52 行的 ref_nam 未定义,并列出 github 对象中的所有可用属性。这种错误 GitHub 不一定会报出,只会悄悄变成空字符串。
本章的 workflow 已通过 actionlint 验证,但没有实际推送到 GitHub 运行(这样会在 ghcr.io 创建包,并通过 SSH 连接真实服务器)。第一次在你的仓库运行时,请前往 Actions 页面检查每个步骤的日志。
服务器端的设置
服务器上的 compose.yaml 要将镜像改为 ghcr.io 的地址:
  app:
    image: ghcr.io/yourname/myapp:${APP_VERSION}
ghcr.io 中新创建的包默认是私有的,服务器需要先登录一次(使用具有 read:packages 权限的 Personal Access Token):
echo "你的 token" | docker login ghcr.io -u yourname --password-stdin--password-stdin 从标准输入读取密码,不会将密码保留在命令历史中。
发布新版本的流程
设置完成后,发布新版本只需运行:
git tag v1.2.0
git push origin v1.2.0
GitHub Actions 会依次执行:检查 Dockerfile → 构建 amd64 与 arm64 → 推送 ghcr.io/yourname/myapp:1.2.0、1.2 → 通过 SSH 将服务器上的 APP_VERSION 改为 1.2.0 → 拉取镜像并重建 app 容器。
要回滚时,在服务器上将 APP_VERSION 改回旧版本,然后运行 docker compose up -d app 即可,旧镜像仍保存在 ghcr.io 上。
重点回顾
- Workflow 放在
.github/workflows/中,用on决定何时运行。 - 官方 Docker Actions:
setup-qemu、setup-buildx、login、metadata、build-push,组合起来就能构建并推送多平台镜像。 - 推送到 ghcr.io 时使用自动提供的
GITHUB_TOKEN,记得设置packages: write。 metadata-action根据分支、版本 tag 和 PR 自动生成镜像 tag。cache-from/to: type=gha可以加快重复构建。- 部署任务只在版本 tag 时运行,通过 SSH 修改
.env并执行pull+up -d。 - 使用 actionlint 在本机预先检查 workflow。
动手练习
练习 1:修改 workflow,让推送到 main 时只构建 amd64(速度更快),只有版本 tag 才构建两个平台。
答案
platforms 也可以使用表达式:
platforms: ${{ startsWith(github.ref, 'refs/tags/v') && 'linux/amd64,linux/arm64' || 'linux/amd64' }}修改后用 actionlint 检查一次。
练习 2:如果创建 tag release-1(不是以 v 开头),会发生什么?
答案
什么都不会发生。on.push.tags 只匹配 v*,release-1 不会触发 workflow;deploy 任务的 if 也只接受以 refs/tags/v 开头的 tag。
练习 3:使用 actionlint 检查你自己项目中的 workflow 文件,看看有没有被忽略的错误。
常见问题
GitHub Actions 要收费吗?
公开(public)仓库使用 GitHub 提供的运行环境是免费的;私有仓库每个月有免费额度,超出后才需要付费。额度和价格以 GitHub 官方说明为准。
为什么推送到 ghcr.io 不需要另外创建密码?
每次运行 workflow 时,GitHub 都会自动提供一个临时的 GITHUB_TOKEN。只要在 workflow 的 permissions 中添加 packages: write,就能用它推送到同一账号或组织的 ghcr.io。
服务器拉取 ghcr.io 的镜像时出现 unauthorized 怎么办?
新创建的 ghcr.io 包默认是私有的。服务器要先使用具有 read:packages 权限的 Personal Access Token 执行 docker login ghcr.io,或者在 GitHub 的包设置中将其改为公开。
多平台构建很慢怎么办?
在 GitHub 的 x86 运行环境上构建 arm64 时使用 QEMU 模拟,需要编译的步骤会慢很多。可以只在创建版本 tag 时构建 arm64、使用 cache-from: type=gha 缓存,或者改用 arm64 运行环境分别构建。支持交叉编译的语言(Go、Rust)可以参考[多平台镜像](/zh/docker/multi-platform/)中的写法。
更新于 2026年10月13日