目录
Docker 安装教程:在 Windows、macOS 和 Linux 上安装并验证
Docker 在不同操作系统上的安装方式不同:
| 系统 | 安装什么 | 说明 |
|---|---|---|
| Windows | Docker Desktop | 通过 WSL 2 在后台运行一个 Linux 环境来运行 Docker Engine |
| macOS | Docker Desktop | 内置一个轻量级 Linux 虚拟机 |
| Linux | Docker Engine | 直接安装,不需要虚拟机;也可以选择安装 Docker Desktop for Linux |
Docker Desktop 对个人、教育用途、非商业开源项目以及小型企业(员工少于 250 人且年营收少于 1,000 万美元)免费;规模更大的企业需要付费订阅。Linux 上的 Docker Engine 是开源软件,不受此限制。
Windows
1. 检查系统要求
- Windows 10 22H2(内部版本 19045)或 Windows 11 23H2(内部版本 22631)及以上,64 位
- 至少 8 GB 内存
- CPU 支持虚拟化,并且已在 BIOS / UEFI 中启用
按 Win + R,输入 winver 可以查看 Windows 版本和内部版本号。
2. 检查是否已启用虚拟化
打开“任务管理器”→“性能”→“CPU”,右下角的 Virtualization(虚拟化) 应显示 Enabled(已启用):
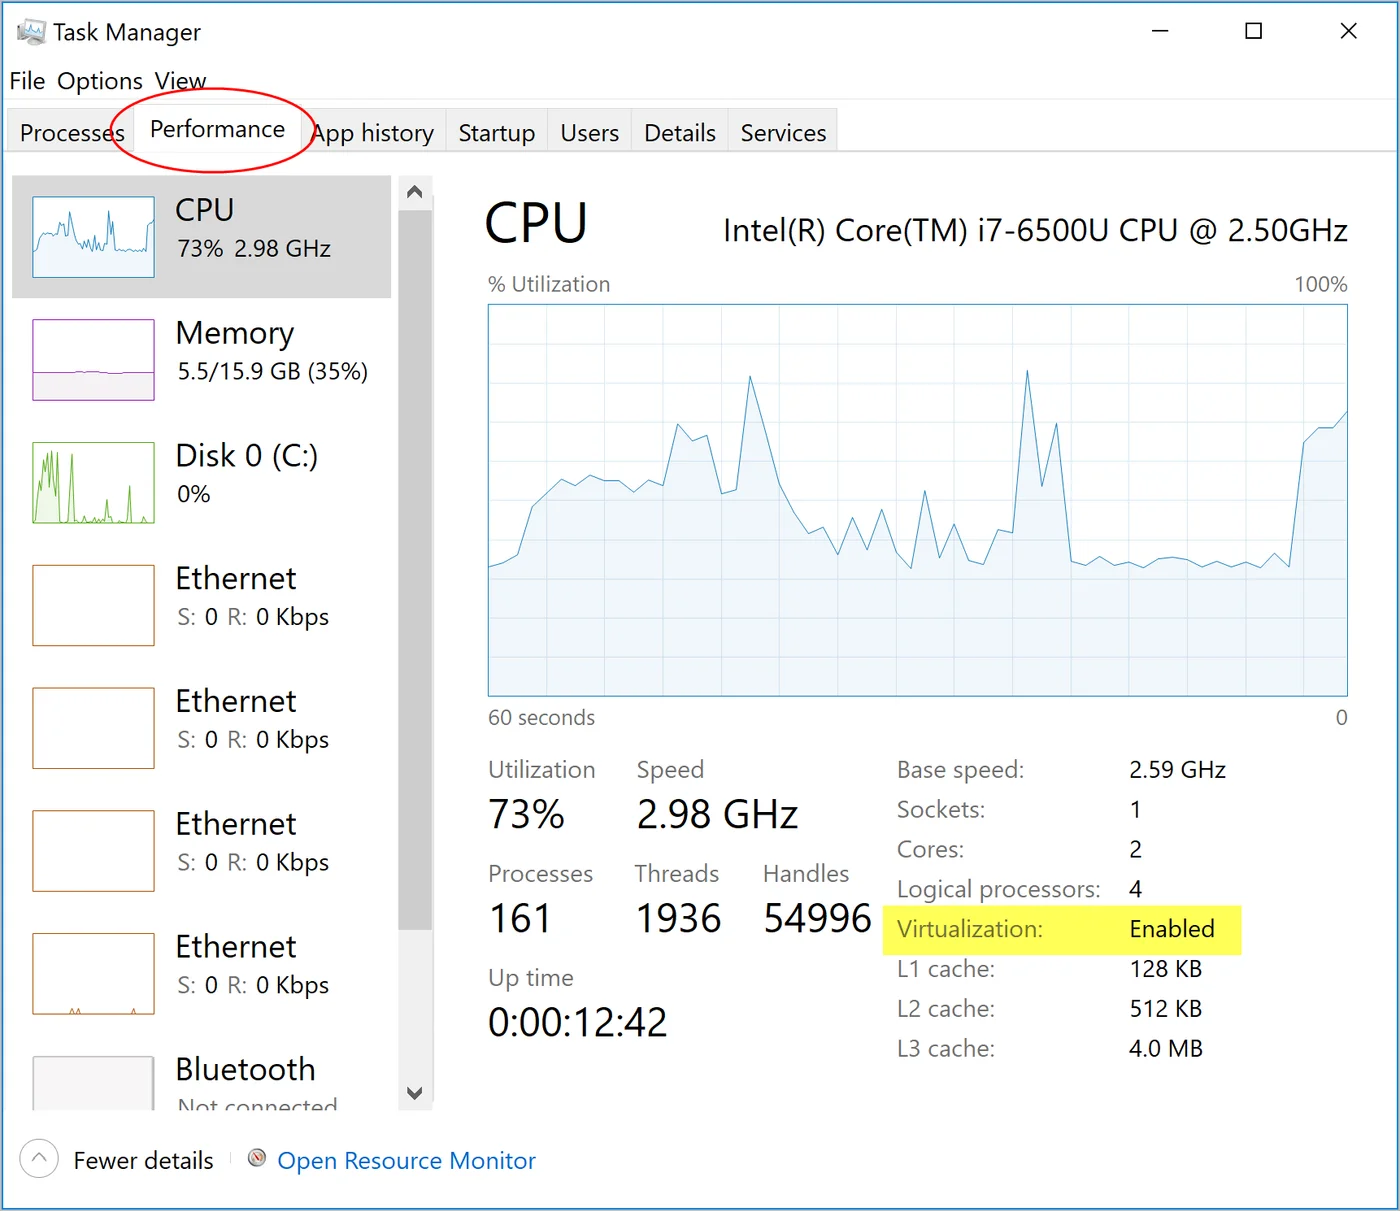
如果显示“已禁用”,需要重启进入 BIOS / UEFI 设置,启用 Intel VT-x 或 AMD-V(SVM)(不同品牌主板的选项名称各不相同)。
3. 安装或更新 WSL 2
以管理员身份打开 PowerShell,运行:
wsl --install如果已经安装过 WSL,请更新到最新版本:
wsl --update
wsl --version
wsl --version 显示的 WSL 版本需要是 2.1.5 以上。安装后按提示重启。
也可以在“控制面板 → 程序和功能 → 启用或关闭 Windows 功能”中确认已勾选以下两项:
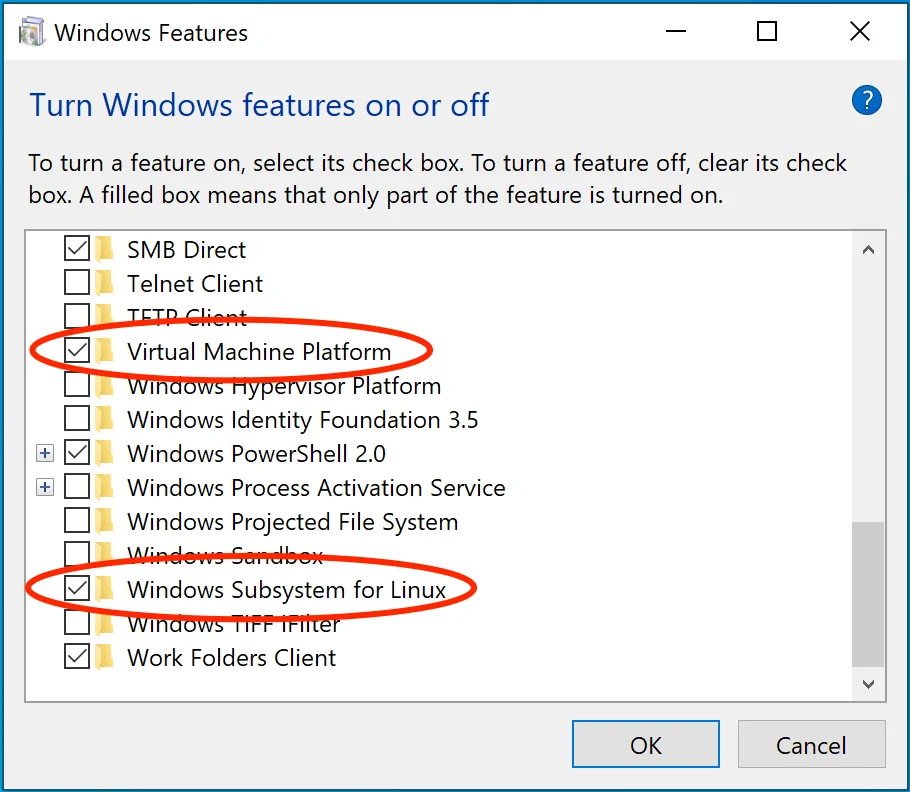
4. 安装 Docker Desktop
- 前往 Docker 官网下载 Docker Desktop for Windows(普通电脑选择 x86_64 / AMD64,Surface 等 ARM 电脑选择 ARM64)。
- 运行
Docker Desktop Installer.exe。 - 在设置界面中保持勾选 Use WSL 2 instead of Hyper-V(recommended)。
- 安装完成后点击 Close,并按提示注销或重启。
5. 首次启动
- 从开始菜单打开 Docker Desktop。
- 阅读并接受服务条款。
- 可以登录 Docker 账号,也可以跳过(Skip);不登录不影响本教程中的操作。
- 等左下角显示 Engine 正在运行(绿色)即可。
Docker Desktop 运行时,可以在 PowerShell、命令提示符和 WSL 终端中直接使用 docker 命令。接下来跳到下方的验证安装成功。
macOS
1. 确认芯片类型
点击左上角苹果菜单 →“关于本机”:
- “芯片”显示 Apple M 系列 → 下载 Apple Silicon 版本
- “处理器”显示 Intel → 下载 Intel chip 版本
系统要求:使用最新的三个 macOS 主要版本之一,至少 4 GB 内存。
2. 安装
- 前往 Docker 官网下载对应版本的
Docker.dmg。 - 打开
Docker.dmg,将 Docker 图标拖到“应用程序”文件夹。 - 从“应用程序”中打开 Docker,首次打开时系统会询问是否允许,选择“打开”。
- 接受服务条款,并按提示输入 Mac 密码以授权安装必要组件。
- 菜单栏出现鲸鱼图标,并且 Docker Desktop 显示 Engine 正在运行,即表示安装完成。
在 Apple Silicon 上,建议另外安装 Rosetta 2,部分仅提供 Intel 版本的工具会用到它:
softwareupdate --install-rosettaLinux(Ubuntu)
在 Linux 上直接安装 Docker Engine。以下步骤已在 Ubuntu 26.04 LTS 上实际运行过,在 Ubuntu 24.04 上完全相同(命令会自动获取系统的版本代号)。
1. 移除旧版或冲突的软件包
Ubuntu 内置的软件包仓库也提供 docker.io 等软件包,版本较旧,并且与官方版本冲突。先将其移除(即使之前没有安装也不会出错):
for pkg in docker.io docker-doc docker-compose docker-compose-v2 podman-docker containerd runc; do sudo apt-get remove -y $pkg; done2. 添加 Docker 官方软件包仓库
sudo apt-get update
sudo apt-get install -y ca-certificates curl
sudo install -m 0755 -d /etc/apt/keyrings
sudo curl -fsSL https://download.docker.com/linux/ubuntu/gpg -o /etc/apt/keyrings/docker.asc
sudo chmod a+r /etc/apt/keyrings/docker.asc

echo "deb [arch=$(dpkg --print-architecture) signed-by=/etc/apt/keyrings/docker.asc] \
  https://download.docker.com/linux/ubuntu $(. /etc/os-release && echo "$VERSION_CODENAME") stable" \
  | sudo tee /etc/apt/sources.list.d/docker.list > /dev/null
添加后运行 sudo apt-get update,输出中应该出现 download.docker.com 软件包仓库(节选,resolute 是 Ubuntu 26.04 的版本代号,24.04 会显示 noble):
$ sudo apt-get update
Get:1 https://download.docker.com/linux/ubuntu resolute InRelease [32.5 kB]
Get:2 https://download.docker.com/linux/ubuntu resolute/stable amd64 Packages [33.2 kB]
3. 安装 Docker Engine
sudo apt-get install -y docker-ce docker-ce-cli containerd.io docker-buildx-plugin docker-compose-plugin| 软件包 | 内容 |
|---|---|
docker-ce | Docker Engine(dockerd) |
docker-ce-cli | docker 命令行工具 |
containerd.io | 底层容器运行环境 |
docker-buildx-plugin | docker buildx/BuildKit 构建工具 |
docker-compose-plugin | docker compose |
以下是实际安装输出(节选)和安装后的版本:
$ sudo apt-get install -y docker-ce docker-ce-cli containerd.io docker-buildx-plugin docker-compose-plugin
Need to get 128 MB of archives.
After this operation, 511 MB of additional disk space will be used.
Setting up docker-buildx-plugin (0.38.0-1~ubuntu.26.04~resolute) ...
Setting up containerd.io (2.4.1-2~ubuntu.26.04~resolute) ...
Setting up docker-compose-plugin (5.6.0-1~ubuntu.26.04~resolute) ...
Setting up docker-ce-cli (5:29.9.0-1~ubuntu.26.04~resolute) ...
Setting up docker-ce (5:29.9.0-1~ubuntu.26.04~resolute) ...
Setting up docker-ce-rootless-extras (5:29.9.0-1~ubuntu.26.04~resolute) ...

$ docker --version
Docker version 29.9.0, build f415da8
$ docker compose version
Docker Compose version v5.6.0
$ docker buildx version
github.com/docker/buildx v0.38.0 0dbe87f36ed472fe36b6796c3f70b4210a731fc5
$ containerd --version
containerd containerd v2.4.1 f2551031d7276a770f65f98c9b52e57e7dad07e8
安装完成后,Docker 服务会自动启动,并设置为开机自动启动。可以使用 systemctl 确认:
sudo systemctl status docker状态显示 active (running) 就表示服务正在运行。
4. 让普通用户也能运行 docker
刚安装完成时,只有 root 能使用 Docker,普通用户运行 docker 命令会出现权限错误:
$ docker ps
permission denied while trying to connect to the docker API at unix:///var/run/docker.sock
将自己添加到 docker 组:
sudo usermod -aG docker $USER注销后重新登录(或运行 newgrp docker)后即可生效。
加入
docker组相当于拥有 root 权限(可以创建挂载整个系统的容器),因此只应对可信账号这样做。
验证安装成功
无论使用哪个系统,打开终端(Windows 使用 PowerShell)并运行:
$ docker version
Client:
 Version:           29.9.0
 API version:       1.56
 Go version:        go1.26.9
 Git commit:        f415da8
 Built:             Thu Oct  8 20:36:58 2026
 OS/Arch:           linux/amd64
 Context:           default

Server: Docker Engine - Community
 Engine:
  Version:          29.9.0
  API version:      1.56 (minimum version 1.40)
  Go version:       go1.26.9
  Git commit:       a5b58c9
  Built:            Thu Oct  8 20:39:33 2026
  OS/Arch:          linux/amd64
  Experimental:     false
 containerd:
  Version:          v2.4.1
  GitCommit:
 runc:
  Version:          1.5.2
  GitCommit:        v1.5.2-0-g29dd3dc
 docker-init:
  Version:          0.19.0
  GitCommit:        de40ad0
重点是同时看到 Client 和 Server 两段(Windows 和 macOS 的 Client 会显示 windows/amd64 或 darwin/arm64,Server 一律是 linux,因为 Docker Engine 运行在 Docker Desktop 的 Linux 环境中):
- Client:你输入的
docker命令行工具 - Server:在后台运行的 Docker Engine
如果 Server 部分变成错误信息,说明 Engine 没有运行,参见下方的常见问题。
接下来运行第一个容器:
$ docker run hello-world
Unable to find image 'hello-world:latest' locally
latest: Pulling from library/hello-world
4f55086f7dd0: Pull complete
Digest: sha256:5e23090353324d887c48ad5e5c56d294eab81588df9605b07d1afe895f9cc8f8
Status: Downloaded newer image for hello-world:latest

Hello from Docker!
This message shows that your installation appears to be working correctly.

To generate this message, Docker took the following steps:
 1. The Docker client contacted the Docker daemon.
 2. The Docker daemon pulled the "hello-world" image from the Docker Hub.
    (amd64)
 3. The Docker daemon created a new container from that image which runs the
    executable that produces the output you are currently reading.
 4. The Docker daemon streamed that output to the Docker client, which sent it
    to your terminal.

To try something more ambitious, you can run an Ubuntu container with:
 $ docker run -it ubuntu bash

Share images, automate workflows, and more with a free Docker ID:
 https://hub.docker.com/

For more examples and ideas, visit:
 https://docs.docker.com/get-started/
以上输出说明刚才发生了四件事:CLI 联系 Engine → Engine 从 Docker Hub 下载 hello-world 镜像 → 使用它创建并运行容器 → 将输出传回你的终端。
最后检查 Compose 和 Buildx:
$ docker compose version
Docker Compose version v5.6.0

$ docker buildx version
github.com/docker/buildx v0.38.0 0dbe87f36ed472fe36b6796c3f70b4210a731fc5
疑难解答
failed to connect to the docker API
旧版 Docker 的提示是 Cannot connect to the Docker daemon,Docker 29 改为如下内容:
$ docker ps
failed to connect to the docker API at unix:///var/run/docker.sock; check if the path is correct and if the daemon is running: dial unix /var/run/docker.sock: connect: no such file or directory
这表示 Docker Engine 没有运行。
-
Windows / macOS:打开 Docker Desktop,等待它显示 Engine running。
-
Linux:启动服务并设置为开机自动启动:
sudo systemctl start docker
sudo systemctl enable docker
permission denied while trying to connect to the docker API
这是 Linux 上的权限问题(见上方第 4 步中的实际错误信息)。将自己添加到 docker 组,然后注销后重新登录。只运行 usermod 而没有重新登录,组权限不会生效。
Windows:WSL 2 installation is incomplete
WSL 尚未安装或版本过旧。以管理员身份运行 wsl --update,重启后再打开 Docker Desktop。
Windows:Virtualization support not detected
BIOS / UEFI 中没有启用虚拟化,参见上方 Windows 第 2 步。
重点回顾
- Windows、macOS 安装 Docker Desktop;Linux 服务器安装 Docker Engine。
- Windows 需要启用 CPU 虚拟化,并使用 2.1.5 以上版本的 WSL。
docker version同时显示 Client 和 Server,才表示 Engine 正在运行。- Linux 普通用户需要加入
docker组,这相当于授予 root 权限。
动手练习
练习 1:运行 docker version,找出 Docker Engine 版本以及 Server 的 OS/Arch。
提示
查看 Server: Docker Engine 部分中的 Version 和 OS/Arch。Windows 和 macOS 的 Server 一律是 linux/amd64 或 linux/arm64,因为 Engine 运行在 Docker Desktop 的 Linux 虚拟机中。
练习 2:运行 docker run hello-world 后,再运行 docker ps -a。为什么能看到一个已经结束的容器?
答案
hello-world 打印信息后就结束了,容器停止但没有被删除。添加 --rm 运行,就会在结束后自动删除;参见容器生命周期。
常见问题
Windows 家庭版可以安装 Docker Desktop 吗?
可以。Docker Desktop 使用 WSL 2,Windows 10 / 11 家庭版也支持,只要版本和内部版本符合要求,并且已启用 CPU 虚拟化。
Linux 上应该安装 Docker Desktop 还是 Docker Engine?
服务器上一律安装 Docker Engine。Linux 桌面两者都可以;本教程中的命令在两种环境下都适用。
安装后运行 docker 时出现 permission denied 怎么办?
在 Linux 上,普通用户需要加入 docker 组并重新登录,步骤见本章的“让普通用户也能运行 docker”。
更新于 2026年10月14日