Contents
Docker Installation Tutorial: Install Docker on Windows, macOS, and Linux
Docker installation varies by operating system:
| System | What to install | Notes |
|---|---|---|
| Windows | Docker Desktop | Runs a Linux environment in the background through WSL 2 to run Docker Engine |
| macOS | Docker Desktop | Includes a lightweight Linux virtual machine |
| Linux | Docker Engine | Install it directly; no virtual machine is needed. You can also choose to install Docker Desktop for Linux |
Docker Desktop is free for personal use, education, noncommercial open source projects, and small businesses (fewer than 250 employees and less than $10 million in annual revenue). Larger businesses need a paid subscription. Docker Engine on Linux is open source and is not subject to these terms.
Windows
1. Check the system requirements
- Windows 10 22H2 (build 19045) or Windows 11 23H2 (build 22631) or later, 64-bit
- At least 8 GB of memory
- A CPU that supports virtualization, with virtualization enabled in BIOS / UEFI
Press Win + R, enter winver, and check your Windows version and build number.
2. Make sure virtualization is enabled
Open Task Manager → Performance → CPU. In the lower-right corner, Virtualization should show Enabled:
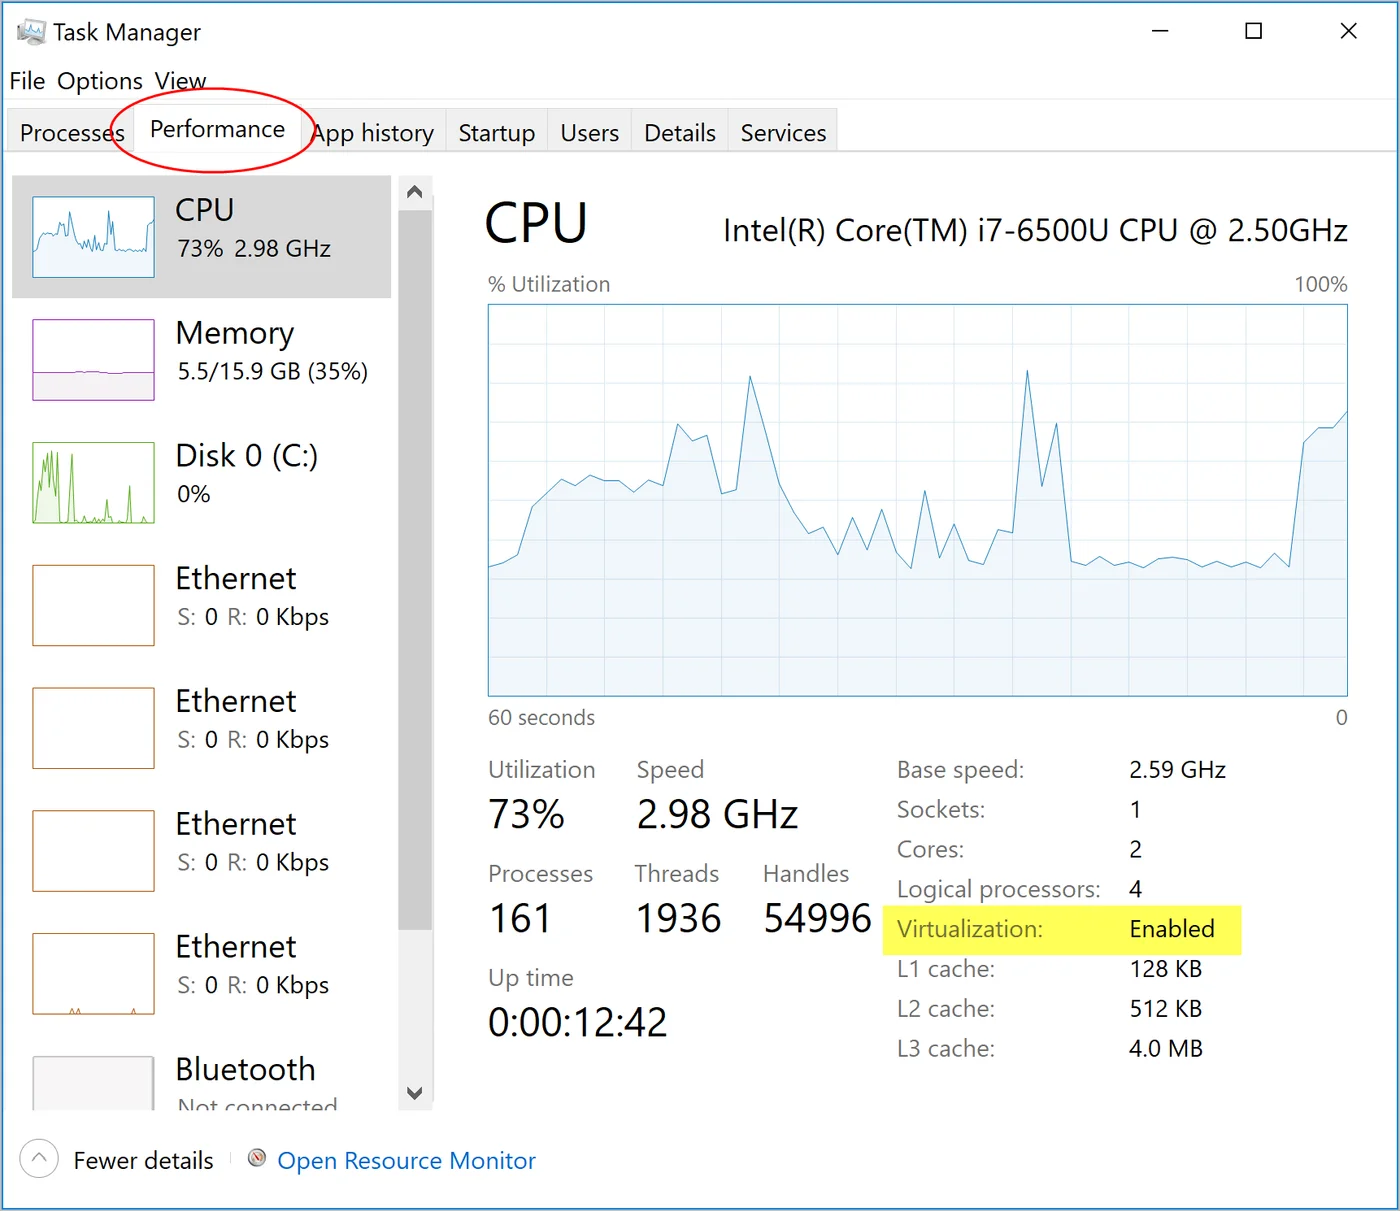
If it shows “Disabled,” restart your computer and enter BIOS / UEFI setup, then enable Intel VT-x or AMD-V (SVM) (the option name varies by motherboard manufacturer).
3. Install or update WSL 2
Open PowerShell as an administrator and run:
wsl --installIf you already have WSL installed, update it to the latest version:
wsl --update
wsl --version
The WSL version shown by wsl --version must be 2.1.5 or later. Restart your computer after installation when prompted.
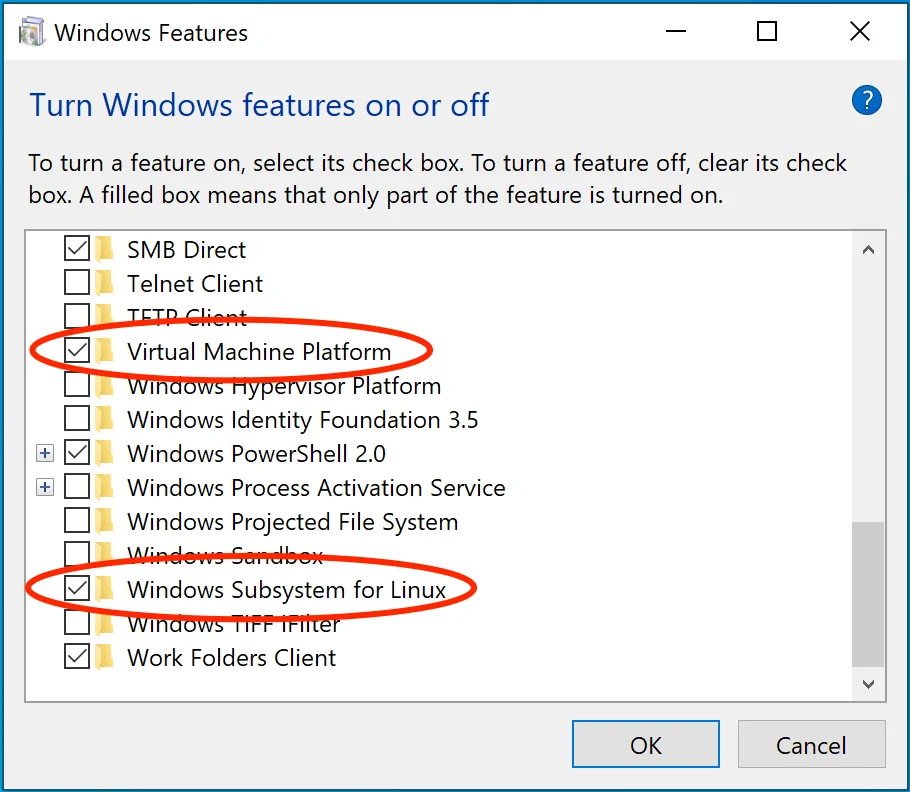
You can also check that these two options are selected in Control Panel → Programs and Features → Turn Windows features on or off:
4. Install Docker Desktop
- Download Docker Desktop for Windows from the Docker website (choose x86_64 / AMD64 for a regular PC, or ARM64 for an ARM computer such as a Surface).
- Run
Docker Desktop Installer.exe. - Keep Use WSL 2 instead of Hyper-V (recommended) selected on the setup screen.
- When installation finishes, click Close and sign out or restart if prompted.
5. Start Docker for the first time
- Open Docker Desktop from the Start menu.
- Read and accept the terms of service.
- You can sign in to your Docker account or skip this step (Skip). You don't need to sign in to follow this tutorial.
- When the lower-left corner shows that the Engine is running (green), you're ready.
While Docker Desktop is running, you can use the docker command in PowerShell, Command Prompt, or a WSL terminal. Next, jump to Verify the installation.
macOS
1. Check your chip type
Click the Apple menu in the upper-left corner → About This Mac:
- If Apple M series appears next to “Chip,” download the Apple Silicon version.
- If Intel appears next to “Processor,” download the Intel chip version.
System requirements: one of the three latest major macOS versions and at least 4 GB of memory.
2. Install
- Download the matching version of
Docker.dmgfrom the Docker website. - Open
Docker.dmgand drag the Docker icon into the Applications folder. - Open Docker from Applications. When prompted the first time, choose “Open.”
- Accept the terms of service and enter your Mac password when prompted to authorize installation of the required components.
- When the whale icon appears in the menu bar and Docker Desktop shows that the Engine is running, you're ready.
On Apple Silicon, we recommend installing Rosetta 2 as well. Some tools are available only for Intel:
softwareupdate --install-rosettaLinux (Ubuntu)
Install Docker Engine directly on Linux. The following steps were tested on Ubuntu 26.04 LTS and are exactly the same for Ubuntu 24.04 (the commands automatically get the system's version codename).
1. Remove old or conflicting packages
Ubuntu's built-in package repositories also include packages such as docker.io. These are older and conflict with the official version. Remove them first (this won't cause an error if they aren't installed):
for pkg in docker.io docker-doc docker-compose docker-compose-v2 podman-docker containerd runc; do sudo apt-get remove -y $pkg; done2. Add the official Docker package repository
sudo apt-get update
sudo apt-get install -y ca-certificates curl
sudo install -m 0755 -d /etc/apt/keyrings
sudo curl -fsSL https://download.docker.com/linux/ubuntu/gpg -o /etc/apt/keyrings/docker.asc
sudo chmod a+r /etc/apt/keyrings/docker.asc

echo "deb [arch=$(dpkg --print-architecture) signed-by=/etc/apt/keyrings/docker.asc] \
  https://download.docker.com/linux/ubuntu $(. /etc/os-release && echo "$VERSION_CODENAME") stable" \
  | sudo tee /etc/apt/sources.list.d/docker.list > /dev/null
After adding it, run sudo apt-get update. The output should include the download.docker.com package repository (excerpt; resolute is the Ubuntu 26.04 codename, while 24.04 shows noble):
$ sudo apt-get update
Get:1 https://download.docker.com/linux/ubuntu resolute InRelease [32.5 kB]
Get:2 https://download.docker.com/linux/ubuntu resolute/stable amd64 Packages [33.2 kB]
3. Install Docker Engine
sudo apt-get install -y docker-ce docker-ce-cli containerd.io docker-buildx-plugin docker-compose-plugin| Package | Contents |
|---|---|
docker-ce | Docker Engine (dockerd) |
docker-ce-cli | The docker command-line tool |
containerd.io | The underlying container runtime |
docker-buildx-plugin | docker buildx / BuildKit build tools |
docker-compose-plugin | docker compose |
Here is an excerpt of the actual installation output and the versions afterward:
$ sudo apt-get install -y docker-ce docker-ce-cli containerd.io docker-buildx-plugin docker-compose-plugin
Need to get 128 MB of archives.
After this operation, 511 MB of additional disk space will be used.
Setting up docker-buildx-plugin (0.38.0-1~ubuntu.26.04~resolute) ...
Setting up containerd.io (2.4.1-2~ubuntu.26.04~resolute) ...
Setting up docker-compose-plugin (5.6.0-1~ubuntu.26.04~resolute) ...
Setting up docker-ce-cli (5:29.9.0-1~ubuntu.26.04~resolute) ...
Setting up docker-ce (5:29.9.0-1~ubuntu.26.04~resolute) ...
Setting up docker-ce-rootless-extras (5:29.9.0-1~ubuntu.26.04~resolute) ...

$ docker --version
Docker version 29.9.0, build f415da8
$ docker compose version
Docker Compose version v5.6.0
$ docker buildx version
github.com/docker/buildx v0.38.0 0dbe87f36ed472fe36b6796c3f70b4210a731fc5
$ containerd --version
containerd containerd v2.4.1 f2551031d7276a770f65f98c9b52e57e7dad07e8
After installation, the Docker service starts automatically and is configured to start at boot. Check with systemctl:
sudo systemctl status dockerIf the status shows active (running), it's running.
4. Let regular users run docker
Right after installation, only root can use Docker. If a regular user runs the docker command, they'll get a permission error:
$ docker ps
permission denied while trying to connect to the docker API at unix:///var/run/docker.sock
Add yourself to the docker group:
sudo usermod -aG docker $USERThe change takes effect after you log out and log back in (or run newgrp docker).
Membership in the
dockergroup is equivalent to root access (you can create containers that mount the entire system). Only do this for accounts you trust.
Verify the installation
On any system, open a terminal (PowerShell on Windows) and run:
$ docker version
Client:
 Version:           29.9.0
 API version:       1.56
 Go version:        go1.26.9
 Git commit:        f415da8
 Built:             Thu Oct  8 20:36:58 2026
 OS/Arch:           linux/amd64
 Context:           default

Server: Docker Engine - Community
 Engine:
  Version:          29.9.0
  API version:      1.56 (minimum version 1.40)
  Go version:       go1.26.9
  Git commit:       a5b58c9
  Built:            Thu Oct  8 20:39:33 2026
  OS/Arch:          linux/amd64
  Experimental:     false
 containerd:
  Version:          v2.4.1
  GitCommit:
 runc:
  Version:          1.5.2
  GitCommit:        v1.5.2-0-g29dd3dc
 docker-init:
  Version:          0.19.0
  GitCommit:        de40ad0
The key is to see both the Client and Server sections (the Client on Windows and macOS shows windows/amd64 or darwin/arm64; the Server is always linux because Docker Engine runs in Docker Desktop's Linux environment):
- Client: the
dockercommand-line tool you run - Server: Docker Engine running in the background
If the Server section shows an error, the Engine isn't running. See the common issues below.
Next, run your first container:
$ docker run hello-world
Unable to find image 'hello-world:latest' locally
latest: Pulling from library/hello-world
4f55086f7dd0: Pull complete
Digest: sha256:5e23090353324d887c48ad5e5c56d294eab81588df9605b07d1afe895f9cc8f8
Status: Downloaded newer image for hello-world:latest

Hello from Docker!
This message shows that your installation appears to be working correctly.

To generate this message, Docker took the following steps:
 1. The Docker client contacted the Docker daemon.
 2. The Docker daemon pulled the "hello-world" image from the Docker Hub.
    (amd64)
 3. The Docker daemon created a new container from that image which runs the
    executable that produces the output you are currently reading.
 4. The Docker daemon streamed that output to the Docker client, which sent it
    to your terminal.

To try something more ambitious, you can run an Ubuntu container with:
 $ docker run -it ubuntu bash

Share images, automate workflows, and more with a free Docker ID:
 https://hub.docker.com/

For more examples and ideas, visit:
 https://docs.docker.com/get-started/
This output describes what just happened: the CLI contacted the Engine → the Engine downloaded the hello-world image from Docker Hub → it created and ran a container from it → it sent the output back to your terminal.
Finally, check Compose and Buildx:
$ docker compose version
Docker Compose version v5.6.0

$ docker buildx version
github.com/docker/buildx v0.38.0 0dbe87f36ed472fe36b6796c3f70b4210a731fc5
Troubleshooting
failed to connect to the docker API
Older Docker versions say Cannot connect to the Docker daemon. Docker 29 changed this to:
$ docker ps
failed to connect to the docker API at unix:///var/run/docker.sock; check if the path is correct and if the daemon is running: dial unix /var/run/docker.sock: connect: no such file or directory
This means Docker Engine isn't running.
-
Windows / macOS: Open Docker Desktop and wait until it shows Engine running.
-
Linux: Start the service and configure it to start at boot:
sudo systemctl start docker
sudo systemctl enable docker
permission denied while trying to connect to the docker API
This is a permissions issue on Linux (see the actual error in step 4 above). Add yourself to the docker group, then log out and log back in. If you run usermod but don't log back in, the group change won't take effect.
Windows: WSL 2 installation is incomplete
WSL isn't installed or is out of date. Run wsl --update as an administrator, restart your computer, and then open Docker Desktop again.
Windows: Virtualization support not detected
Virtualization isn't enabled in BIOS / UEFI. See step 2 under Windows above.
Recap
- Install Docker Desktop on Windows and macOS; install Docker Engine on Linux servers.
- Windows requires CPU virtualization and WSL 2.1.5 or later.
- Seeing both Client and Server in
docker versionmeans the Engine is running. - Regular Linux users must be added to the
dockergroup, which grants root access.
Exercises
Exercise 1: Run docker version and find your Docker Engine version and the Server OS/Arch.
Hint
Look at Version and OS/Arch in the Server: Docker Engine section. On Windows and macOS, the Server is always linux/amd64 or linux/arm64 because the Engine runs in Docker Desktop's Linux virtual machine.
Exercise 2: After running docker run hello-world, run docker ps -a. Why do you see a container that has already exited?
Answer
hello-world exits after printing its message. The container stops but isn't deleted. Run it with --rm to delete it automatically when it exits. See Container lifecycle.
FAQ
Can I install Docker Desktop on Windows Home?
Yes. Docker Desktop uses WSL 2, which is supported on Windows 10 / 11 Home as long as the version and build meet the requirements and CPU virtualization is enabled.
Should I install Docker Desktop or Docker Engine on Linux?
Always install Docker Engine on servers. Either works on a Linux desktop; the commands in this tutorial work in both environments.
Getting permission denied when running docker after installation?
On Linux, regular users need to be added to the docker group and log in again. See “Let regular users run docker” in this chapter.
Updated October 14, 2026