目錄
Docker 映像檔教學:pull、images、tag、rmi 與分層結構
映像檔(image)是建立容器的範本。上一節的 docker run nginx:1.30 背後,Docker 先下載了 nginx:1.30 這個映像檔。本節說明映像檔怎麼命名、怎麼下載、怎麼查看與刪除,以及它「一層一層」的結構。
映像檔名稱的組成
一個完整的映像檔名稱長這樣:
docker.io/library/nginx:1.30-alpine
└───┬───┘ └──┬──┘ └─┬─┘ └────┬────┘
registry 命名空間 名稱 tag| 部分 | 說明 | 省略時的預設值 |
|---|---|---|
| registry | 存放映像檔的伺服器 | docker.io(Docker Hub) |
| 命名空間 | 使用者或組織名稱 | 官方映像檔是 library |
| 名稱(repository) | 映像檔名稱 | 不可省略 |
| tag | 版本標籤 | latest |
所以下面三種寫法指的是同一個映像檔:
docker pull nginx
docker pull nginx:latest
docker pull docker.io/library/nginx:latest
其他 registry 的映像檔要寫出完整位址,例如 GitHub 的 ghcr.io/owner/app:1.0、Google 的 gcr.io/distroless/static-debian13。
常見的 tag 命名
官方映像檔通常同時提供多種變體:
| tag 範例 | 意思 |
|---|---|
python:3.14 | 以 Debian 為基礎的完整版本,內含編譯工具等大量套件 |
python:3.14-slim | 精簡版 Debian,只保留執行 Python 需要的東西 |
python:3.14-alpine | 以 Alpine Linux 為基礎,體積最小 |
node:24-trixie | 指定 Debian 版本代號(trixie = Debian 13) |
nginx:1.30 / nginx:1.31 | nginx 的 stable(偶數)與 mainline(奇數)版本 |
本節後面會實際下載這三種 Python 映像檔,比較它們的大小。
下載映像檔:docker pull
docker run 時如果本機沒有映像檔,會自動下載;docker pull 則是只下載、不執行。對已經有的映像檔再執行一次 pull,Docker 會檢查有沒有更新:
$ docker pull nginx:1.30
1.30: Pulling from library/nginx
Digest: sha256:9bf97bd7714f5e24c1ccd545ecb9eb5435cb6d109c97cebb15e7e455e0239edb
Status: Image is up to date for nginx:1.30
docker.io/library/nginx:1.30
Image is up to date 代表本機的已經是最新的,沒有重新下載。最後一行是映像檔的完整名稱,可以看到預設的 registry docker.io 與命名空間 library。
親眼看到「共用的層」
接著下載 nginx 的另一個版本 1.31:
$ docker pull nginx:1.31
1.31: Pulling from library/nginx
ecc510c1e359: Already exists
807ab930f3a0: Pull complete
04bdbc7ea6b5: Pull complete
f7e1db57b58b: Pull complete
8020170dc65f: Pull complete
1efc53192927: Pull complete
947d22046304: Pull complete
Digest: sha256:f9ea18bfa4fad859e1ed38259d711da7ccad2c3516e875cec3351a57c859f571
Status: Downloaded newer image for nginx:1.31
docker.io/library/nginx:1.31
第一層 ecc510c1e359 顯示 Already exists:nginx 1.30 和 1.31 都以同一個 Debian 13 基礎層開始,這一層已經在硬碟上,不用重新下載。這就是 第 1 節 說的「映像檔共用底層」。
下載 python:3.14-slim 時也一樣,它同樣以 Debian 13 為基礎:
$ docker pull python:3.14-slim
3.14-slim: Pulling from library/python
ecc510c1e359: Already exists
a5883d972f3b: Pull complete
6aaf5b0aae75: Pull complete
bb8166eb34e6: Pull complete
Digest: sha256:a2b82f3c48559aa0a8446d9af49826b6e2b2016f4cd2afabfe6013ec53729170
Status: Downloaded newer image for python:3.14-slim
docker.io/library/python:3.14-slim
查看本機映像檔:docker images
$ docker images
IMAGE                ID             DISK USAGE   CONTENT SIZE   EXTRA
hello-world:latest   5e2309035332       25.9kB         9.49kB   U
nginx:1.30           9bf97bd7714f        242MB         66.5MB
nginx:1.31           f9ea18bfa4fa        243MB         66.7MB
ubuntu:26.04         f144425ff09b        162MB         45.6MB
Docker 29 的
docker images輸出格式和舊版不同。舊版的欄位是REPOSITORY TAG IMAGE ID CREATED SIZE,網路上很多教學還是舊格式;看到不一樣不用緊張,內容是一樣的。
| 欄位 | 意思 |
|---|---|
| IMAGE | 名稱與 tag |
| ID | 映像檔 ID 的前 12 碼 |
| DISK USAGE | 解壓縮後在硬碟上佔用的空間 |
| CONTENT SIZE | 壓縮後的內容大小,大約等於下載量 |
| EXTRA | U 代表有容器正在使用(In use),這裡是上一節留下的 hello-world 容器 |
docker image ls 和 docker images 是同一個指令。常用的篩選方式:
$ docker images -q
b9767f56a1cc
a2b82f3c4855
9bf97bd7714f
f9ea18bfa4fa
f6a589d43c42
f144425ff09b
5e2309035332
-q 只輸出 ID,常用來搭配其他指令批次處理。docker images nginx 只列出 nginx,docker images --filter dangling=true 列出沒有名稱的「懸空」映像檔(通常是重新建置後被取代的舊版本)。
比較 slim、alpine 與完整版
再下載另外兩個 Python 版本:
$ docker pull python:3.14-alpine
3.14-alpine: Pulling from library/python
e2de96513ba9: Pull complete
48f6a2588427: Pull complete
2a22c5887fa2: Pull complete
d486488257d0: Pull complete
Digest: sha256:f6a589d43c42b9e7f7dc67a12d37132491f362859a5d750607710cc56da3bc72
Status: Downloaded newer image for python:3.14-alpine
docker.io/library/python:3.14-alpine

$ docker pull python:3.14
3.14: Pulling from library/python
4846f2900730: Pull complete
62fe2e747f69: Pull complete
4dc3950125eb: Pull complete
b2eb680928d4: Pull complete
083b5813628d: Pull complete
9b0ef59a9f4a: Pull complete
6e255bfcc16c: Pull complete
Digest: sha256:b9767f56a1cc620aa72d38cc3557d26412e38a4597c92953476136b78894ccbd
Status: Downloaded newer image for python:3.14
docker.io/library/python:3.14
$ docker images python
IMAGE ID DISK USAGE CONTENT SIZE EXTRA
python:3.14 b9767f56a1cc 1.63GB 433MB
python:3.14-alpine f6a589d43c42 82.6MB 21MB
python:3.14-slim a2b82f3c4855 180MB 45.7MB同樣是 Python 3.14,差距非常大:
| 版本 | 下載量(CONTENT SIZE) | 硬碟空間(DISK USAGE) |
|---|---|---|
python:3.14 | 433 MB | 1.63 GB |
python:3.14-slim | 45.7 MB | 180 MB |
python:3.14-alpine | 21 MB | 82.6 MB |
- 完整版內含 gcc 等編譯工具,適合需要在映像檔裡編譯套件的情況(或當作 多階段建置 的建置階段)。
- slim 是大部分應用程式的好選擇。
- alpine 最小,但它使用 musl 而不是 glibc,有些需要編譯的套件(例如部分 Python 套件)在 Alpine 上安裝會比較麻煩。不確定時,選
slim通常比較穩。
幫映像檔加標籤:docker tag
docker tag 不會複製映像檔,只是多加一個名稱指向同一份內容:
$ docker tag nginx:1.30 myname/nginx:v1

$ docker images --filter reference=nginx:1.30 --filter reference=myname/nginx
IMAGE             ID             DISK USAGE   CONTENT SIZE   EXTRA
myname/nginx:v1   9bf97bd7714f        242MB         66.5MB
nginx:1.30        9bf97bd7714f        242MB         66.5MB
兩行的 ID 相同,代表它們是同一個映像檔。推送到 Docker Hub 前,就需要用這種方式把映像檔命名成 你的帳號/名稱:tag,見 推送到 Docker Hub。
tag 不等於固定版本
tag 只是一個「標籤」,維護者可以隨時把它指向新的內容,nginx:1.30 下個月可能會指向 1.30.6。需要完全固定時,可以使用 digest(內容的 SHA256 雜湊):
$ docker images --digests nginx
REPOSITORY   TAG       DIGEST                                                                    IMAGE ID       CREATED      SIZE
nginx        1.30      sha256:9bf97bd7714f5e24c1ccd545ecb9eb5435cb6d109c97cebb15e7e455e0239edb   9bf97bd7714f   6 days ago   242MB
nginx        1.31      sha256:f9ea18bfa4fad859e1ed38259d711da7ccad2c3516e875cec3351a57c859f571   f9ea18bfa4fa   6 days ago   243MB
docker pull nginx@sha256:9bf97bd7714f5e24c1ccd545ecb9eb5435cb6d109c97cebb15e7e455e0239edb用 digest 下載,永遠會得到一模一樣的內容。
刪除映像檔:docker rmi
如果有容器(包含已停止的)正在使用這個映像檔,會無法刪除:
$ docker run -d --name web nginx:1.30
e34409bcf1727f02fc3b0558d202dd057f2116b4a2e9186f83bbed4625842272

$ docker rmi nginx:1.30
Error response from daemon: conflict: unable to delete nginx:1.30 (must be forced) - container e34409bcf172 is using its referenced image 9bf97bd7714f
先刪除使用它的容器,再刪映像檔:
$ docker rm -f web
web

$ docker rmi nginx:1.30
Untagged: nginx:1.30
Deleted: sha256:9bf97bd7714f5e24c1ccd545ecb9eb5435cb6d109c97cebb15e7e455e0239edbUntagged:移除名稱。Deleted:沒有其他名稱指向它時,映像檔本身才會真正被刪除。如果還有myname/nginx:v1這類別名指向同一個映像檔,就只會看到Untagged。
清除不需要的映像檔:
docker image prune      # 只刪懸空映像檔(沒有名稱的 <none>)
docker image prune -a   # 刪除所有沒有被容器使用的映像檔
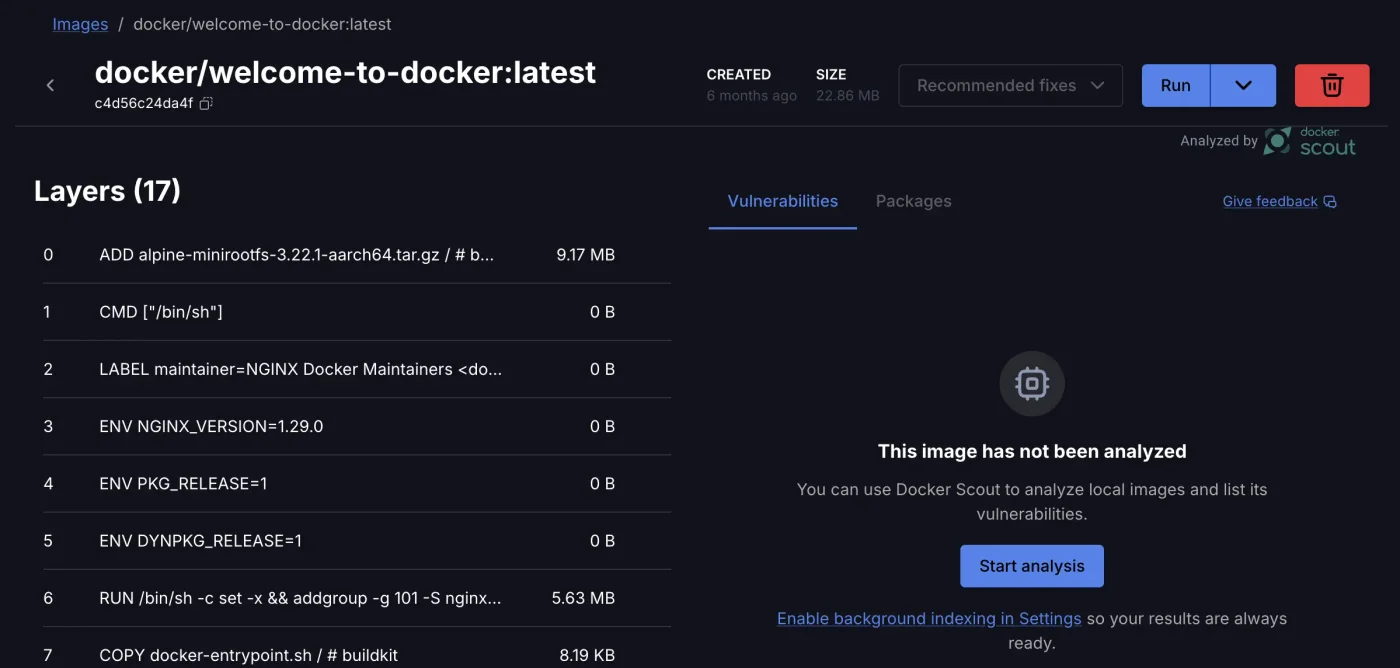
映像檔的分層結構:docker history
docker history 列出映像檔的每一層,以及這一層是由 Dockerfile 的哪個指令產生的:
$ docker history nginx:1.30
IMAGE          CREATED      CREATED BY                                      SIZE      COMMENT
9bf97bd7714f   6 days ago   CMD ["nginx" "-g" "daemon off;"]                0B        buildkit.dockerfile.v0
<missing>      6 days ago   STOPSIGNAL SIGQUIT                              0B        buildkit.dockerfile.v0
<missing>      6 days ago   EXPOSE map[80/tcp:{}]                           0B        buildkit.dockerfile.v0
<missing>      6 days ago   ENTRYPOINT ["/docker-entrypoint.sh"]            0B        buildkit.dockerfile.v0
<missing>      6 days ago   COPY 30-tune-worker-processes.sh /docker-ent…   16.4kB    buildkit.dockerfile.v0
<missing>      6 days ago   COPY 20-envsubst-on-templates.sh /docker-ent…   12.3kB    buildkit.dockerfile.v0
<missing>      6 days ago   COPY 15-local-resolvers.envsh /docker-entryp…   12.3kB    buildkit.dockerfile.v0
<missing>      6 days ago   COPY 10-listen-on-ipv6-by-default.sh /docker…   12.3kB    buildkit.dockerfile.v0
<missing>      6 days ago   COPY docker-entrypoint.sh / # buildkit          8.19kB    buildkit.dockerfile.v0
<missing>      6 days ago   RUN /bin/sh -c set -x     && groupadd --syst…   88.2MB    buildkit.dockerfile.v0
<missing>      6 days ago   ENV DYNPKG_RELEASE=1~trixie                     0B        buildkit.dockerfile.v0
<missing>      6 days ago   ENV PKG_RELEASE=1~trixie                        0B        buildkit.dockerfile.v0
<missing>      6 days ago   ENV ACME_VERSION=0.4.1                          0B        buildkit.dockerfile.v0
<missing>      6 days ago   ENV NJS_RELEASE=1~trixie                        0B        buildkit.dockerfile.v0
<missing>      6 days ago   ENV NJS_VERSION=1.0.1                           0B        buildkit.dockerfile.v0
<missing>      6 days ago   ENV NGINX_VERSION=1.30.5                        0B        buildkit.dockerfile.v0
<missing>      6 days ago   LABEL maintainer=NGINX Docker Maintainers <d…   0B        buildkit.dockerfile.v0
<missing> 7 days ago # debian.sh --arch 'amd64' out/ 'trixie' '@1… 87.7MB debuerreotype 0.17由下往上讀:
- 最底下是 Debian 13(trixie)基礎層,87.7 MB。
- 中間的
RUN ... groupadd ...安裝了 nginx 本身,88.2 MB,是最大的一層。 COPY放入啟動腳本,只有幾 KB。ENV、EXPOSE、CMD等只是設定,大小是 0B。
<missing> 不是錯誤,只代表那些中間層是在別台機器上建置的,本機沒有它們獨立的 ID。
分層帶來兩個好處:
- 共用:多個映像檔都以 Debian 13 為基礎時,那一層只存一份、只下載一次(前面的
Already exists)。 - 快取:建置映像檔時,沒有改變的層可以直接重複使用,這是 建置快取 的基礎。
容器啟動時,Docker 會在這些唯讀層上面加一層可寫層。容器內新增或修改的檔案都寫在這一層,容器刪除時這一層也跟著消失,所以需要保存的資料要放在 Volume 裡。
在 Docker Desktop 中點選某個映像檔,也可以看到同樣的分層資訊:
查看映像檔設定:docker inspect
docker inspect 會輸出映像檔的完整設定(一大段 JSON)。用 --format 只取需要的欄位:
$ docker inspect --format '{{.Config.Cmd}}' nginx:1.30
[nginx -g daemon off;]

$ docker inspect --format '{{.Os}}/{{.Architecture}}' nginx:1.30
linux/amd64

$ docker inspect --format '{{json .Config.ExposedPorts}}' nginx:1.30
{"80/tcp":{}}

$ docker inspect --format '{{range .Config.Env}}{{println .}}{{end}}' nginx:1.30
PATH=/usr/local/sbin:/usr/local/bin:/usr/sbin:/usr/bin:/sbin:/bin
NGINX_VERSION=1.30.5
NJS_VERSION=1.0.1
NJS_RELEASE=1~trixie
ACME_VERSION=0.4.1
PKG_RELEASE=1~trixie
DYNPKG_RELEASE=1~trixie
從這裡可以知道:容器啟動時預設執行 nginx -g daemon off;、這是 linux/amd64 版本、開放 80 連接埠,以及映像檔內建的環境變數。
匯出與匯入:docker save / load
在無法連網的機器之間搬移映像檔時,可以把映像檔存成一個 tar 檔:
$ docker save -o nginx-1.30.tar nginx:1.30

$ ls -lh nginx-1.30.tar
-rw-------    1 root     root       63.4M Oct 12 14:41 nginx-1.30.tar

$ docker rmi nginx:1.30
Untagged: nginx:1.30
Deleted: sha256:9bf97bd7714f5e24c1ccd545ecb9eb5435cb6d109c97cebb15e7e455e0239edb

$ docker load -i nginx-1.30.tar
Loaded image: nginx:1.30
把 tar 檔複製到另一台機器,執行 docker load 就能使用,不需要連到 Docker Hub。
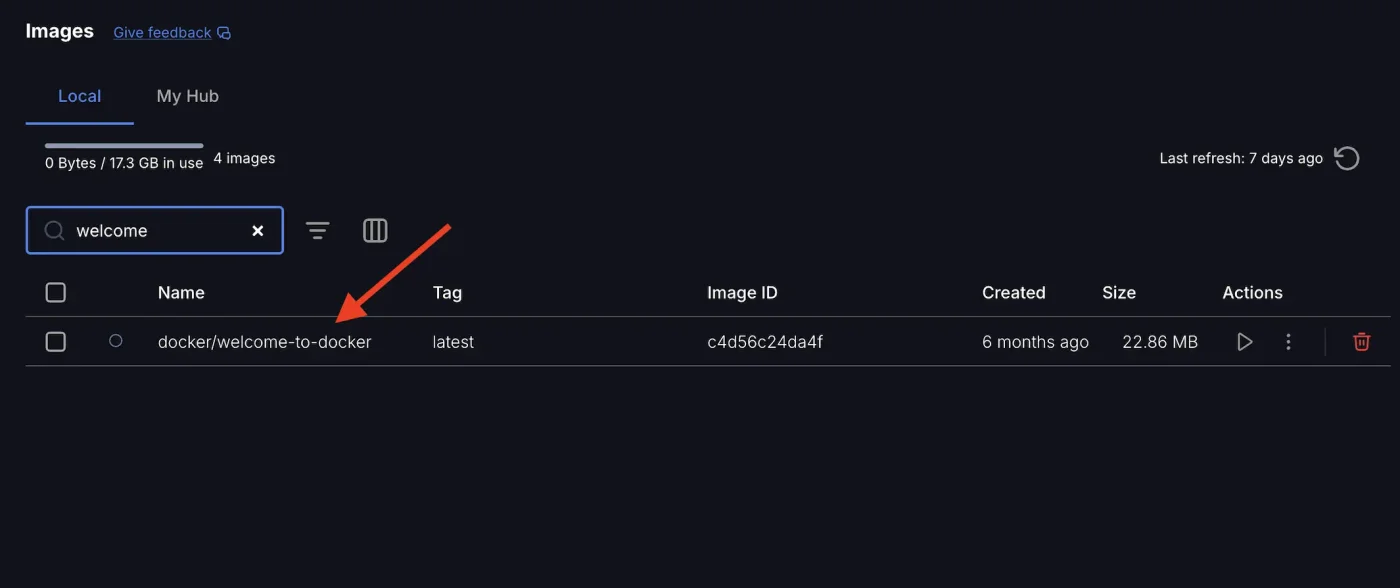
用 Docker Desktop 管理映像檔
在 Docker Desktop 左側選單點選 Images,可以看到本機所有映像檔,等於 docker images;右側的按鈕可以直接執行或刪除:
指令整理
| 指令 | 作用 |
|---|---|
docker pull 名稱:tag | 下載映像檔 |
docker images | 列出本機映像檔 |
docker images -q | 只列出 ID |
docker tag 來源 新名稱 | 加上新的名稱 / 標籤 |
docker rmi 名稱 | 刪除映像檔 |
docker image prune -a | 刪除所有未使用的映像檔 |
docker history 名稱 | 查看分層 |
docker inspect 名稱 | 查看設定 |
docker save -o a.tar 名稱 | 匯出成 tar 檔 |
docker load -i a.tar | 從 tar 檔匯入 |
下一節介紹容器從建立到刪除會經過哪些狀態。
重點回顧
- 映像檔名稱是
[registry/]儲存庫:tag,官方映像檔沒有前綴。 - 多個映像檔共用相同的底層,只下載、儲存一次。
- slim 是多數應用程式的好選擇;alpine 最小但相容性較差。
docker history顯示每一層由哪個指令產生。
動手練習
練習 1:下載 alpine:3.23 和 python:3.14-alpine,觀察第二次下載時有沒有出現 Already exists。
提示
如果兩者使用相同的 Alpine 基礎層,第二次下載會顯示該層 Already exists,不需要重新下載。用 docker history 可以比較兩者最底下的層。
練習 2:把 nginx:1.30 加上一個新名稱 mysite/web:test,再刪除這個新名稱。原本的 nginx:1.30 還在嗎?
答案
docker tag nginx:1.30 mysite/web:test
docker rmi mysite/web:test還在。docker rmi 刪除名稱時只會顯示 Untagged,只要映像檔還有其他名稱,實際內容就不會被刪除。
常見問題
latest 是最新版嗎?
不一定。latest 只是一個普通的 tag 名稱,由作者決定指向哪個版本。正式環境請寫明確的版本,例如 nginx:1.30。
Docker 29 的 docker images 欄位怎麼和網路上不一樣?
Docker 29 改成 IMAGE ID DISK USAGE CONTENT SIZE EXTRA,舊版是 REPOSITORY TAG IMAGE ID CREATED SIZE,見本章說明。
要選 slim 還是 alpine?
大部分應用程式選 slim。alpine 最小,但使用 musl libc,部分需要編譯的套件(特別是 Python)安裝時可能失敗或很慢。
更新於 2026年10月14日